Pablo's gs500 page
Uber Fender Eliminator
Home
R1 taillight install on 89-00 gs500
Clear Taillight Lens for 01-03 Models
My Local Canyons
What's it worth?
Progressive fork spring install-the lazy way
Rear shock swap information
More rear shock info-SV650 install
Suspension tuning 101
Installing Suburban-Machinery SV650 handlebars
Install an SV650 headlight
Converting standard 1/4 throttle to 1/5 throttle
Installing LED's in stock taillight
Uber Fender Eliminator
R1 Taillight on 89-00 GS500
Speedo/Tach light replacement
Better handlebar grips
Installing Buell turn signals - Rear
Installing Buell turn signals - Front
Flush mount rear (stock) turn signals
Installing a 2001 Ducati Monster fairing
Fix a broken oil filter cap bolt
General battery info
A Wal-Mart sealed battery?
Chain Maintenance
Installing SV650 Chainguard
Spark plug information
Installing a GSXR front end
Installing a GSXR swingarm
Installing GSXR rear passenger peg brackets
Installing an OEM Bandit 400 rear hugger
Installing a Bandit 400 rear wheel
Installing a GSXR rear wheel-simple swap
Polishing your wheels
"The Mystical Art of Tire Reading" and other tire info
General tire info for the GS #1
General tire info for the GS #2
General tire info for the GS #3 - mixing brands/types
gsJack's opinion on tires for the GS
Gearing and sprockets
Slip-on mufflers
Slip-on exhaust : using stock SV650 muffler
Installing an R6 tail
Installing GSX-R600 stock rearsets
Installing CBR600 stock rearsets
Replacing stock front pegs with CBR pegs
Replacing stock front pegs with Katana pegs
Why re-jet a stock US bike
More on re-jetting your carbs
Jetting for 2001 models
Links

Move license to accentuate the bikes lines.

rearleftlicenseclose.jpg
Barely visible license [note stickers removed and grab rail painted to match]

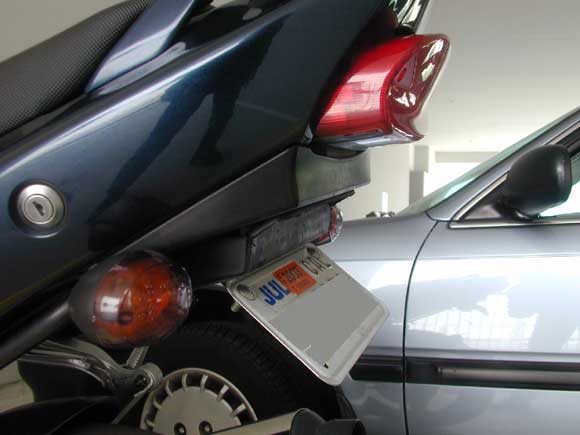
A simple bracket is all that's necessary to move the license plate giving the rear end a sportier look. Notice the angle of the plate (barely visible from side) mirrors the angle of the grab bar.
 
In order to do this you'll need to do several things.
1) You'll have to have a sheet metal bracket made. Mine was 16ga steel, 6 1/4" wide and 2" tall. Drill 4 holes, 2 down near the very bottom edge for license and 2 about 1/2" down from top and 3"-5" apart (these can be anywhere and exact location isn't really important). This can be made by any sheet metal fabricator or you can do it yourself.
 
2) Remove the tool kit for now. You are going to install the bracket on the front lower face of where the tool kit rests. Drill 2 holes in the inner fender into the area of the tool kit. Use the 2 nuts and bolts holding the stock license bracket in place here.
 
3) In order to get the taillight to light up the plate you need to do a serious fenderectomy. Cut off the rear fender up to the body. You end up leaving the tool kit area as the exposed rear face, and the two rear screw holding the inner fender in place are concealed just inside the rear bodywork (on 2001 model, older models need to verify this).
 
4) Attach license place to bracket. If you made the bracket 2" tall the bracket will slide inside the fender snug to the top and sides and leave just enough to mount the license tight to the upper bodywork, exposing no bracket from rear view. You can make a taller bracket if you want the plate lower. As it is now the light gets cut off just above the letters.
 
Check your state's laws governing license plate mounting and lighting. 

rearlicenseunderside.jpg
View of underside showing bracket

rearlicensecloseup.jpg
Another view of the new location

Thank you Mr. Dremel.