Pablo's gs500 page
Installing an R6 tail
Home
R1 taillight install on 89-00 gs500
Clear Taillight Lens for 01-03 Models
My Local Canyons
What's it worth?
Progressive fork spring install-the lazy way
Rear shock swap information
More rear shock info-SV650 install
Suspension tuning 101
Installing Suburban-Machinery SV650 handlebars
Install an SV650 headlight
Converting standard 1/4 throttle to 1/5 throttle
Installing LED's in stock taillight
Uber Fender Eliminator
R1 Taillight on 89-00 GS500
Speedo/Tach light replacement
Better handlebar grips
Installing Buell turn signals - Rear
Installing Buell turn signals - Front
Flush mount rear (stock) turn signals
Installing a 2001 Ducati Monster fairing
Fix a broken oil filter cap bolt
General battery info
A Wal-Mart sealed battery?
Chain Maintenance
Installing SV650 Chainguard
Spark plug information
Installing a GSXR front end
Installing a GSXR swingarm
Installing GSXR rear passenger peg brackets
Installing an OEM Bandit 400 rear hugger
Installing a Bandit 400 rear wheel
Installing a GSXR rear wheel-simple swap
Polishing your wheels
"The Mystical Art of Tire Reading" and other tire info
General tire info for the GS #1
General tire info for the GS #2
General tire info for the GS #3 - mixing brands/types
gsJack's opinion on tires for the GS
Gearing and sprockets
Slip-on mufflers
Slip-on exhaust : using stock SV650 muffler
Installing an R6 tail
Installing GSX-R600 stock rearsets
Installing CBR600 stock rearsets
Replacing stock front pegs with CBR pegs
Replacing stock front pegs with Katana pegs
Why re-jet a stock US bike
More on re-jetting your carbs
Jetting for 2001 models
Links

Quite a bit of work but a rather cool looking result.

gs500_with_r6_tail.jpg
This is an R1 tail (R6 similar except under front side edge)

More detailed instructions when I can find them...sorry. Here's DOUGS early description.


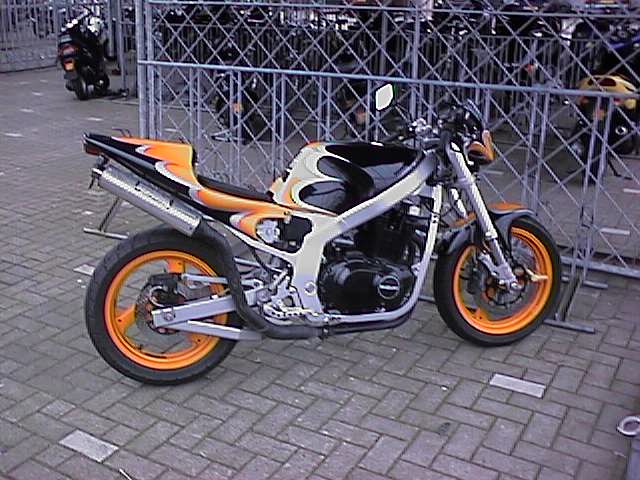
The nice thing. The front two mounting holes on the frame are a perfect location for the ones on the R6 tail. next nice thing: the R6 tail has several mounting holes on the bottom that were zip tied to the subframe.

Disadvantages/challenges. The frame sticks out about a half inch right near the end of the tail. I had to eliminate the fender completely to resolve this, except under the seat area but it's all gone at the rear. The plastic of the R6 tail touches the top of the wheel well., right in front of where the seat spring was in the middle. The stock R6 front seat wont mount due to shape of tank and what not. Also rubber mount on the bottom of seats don't line up with previous contact spots, so if I were to sit down on the seat I'd end up cracking the plastic of the new tail. Not to mention trying to find a way to make the passenger seat have support under it. The luggage rack stick way down and had to be cut off. The seat lock had to be relocated or hang down low. Overall teh subframe sits just in line with the bottom of the R6 tail. Overall I would recommend it if you have an older bike needing new rear bodywork and a little love. R6 tails can be had on ebay for about $60-$100.

I'm 6'1" and I actually redid my stock seat making it about 2 inches taller for a more comfortable seating position. This new tail will actually lower the seat height about an inch or two below stock, depending on how thick I build my own seat. Very bent seating position overall.

If I didn't carry a passenger with me, I'd buy the Airtech R6 race tail conversion and mount that... it would have fiberglass covering the seat section, I could just slap on some seat foam. Plus the back would be a solid unit, would have the little section where their is either a passenger seat or seat cowl... basically cleaner lines. If I were racing this is the way I'd go. It costs the same price as the airtech GS mono seat tail, plus it looks way cooler.

Special thanks to DOUG from GSTwin for providing this (too bad there weren't any pictures before he went back to stock to sell).